Button to trigger an event
In example showcase how to use a physical controller to trigger a digital event in Unity. For that, we use a simple button connected as follows.
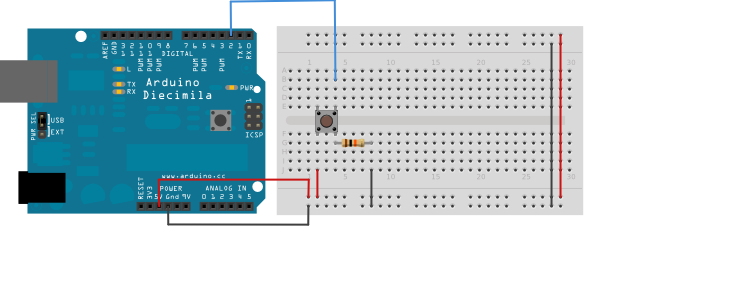
The value read of the button is read and when pressed, the event is launched in Unity.
Arduino code
To optimize speed, we don't want to display the value of the button at every loop, not to fill the buffer.
#include<Uduino.h>
Uduino uduino("uduinoButton");

const int buttonPin = 12;
int buttonState = 0;
int prevButtonState = 0;

void setup()
{
  Serial.begin(9600);
  pinMode(buttonPin, INPUT_PULLUP);
}

void loop()
{
  uduino.update();

  buttonState = digitalRead(buttonPin);

  if (buttonState != prevButtonState) {
    Serial.println(buttonState); // Simple serial print only when the value is changed
    prevButtonState = buttonState;
  }
  delay(15);

}
Unity code
We use the AlwaysRead method on the initialization (Awake() or Start()).
This method allows Uduino to continuously read the serial port of the arduino board.
Two solutions can be used to trigger a n event; the delegate method or the callback methods. Performances are the same, it all depends on your preferences !
Solution 1 : Adding a custom callback
    void Awake()
    {
        UduinoManager.Instance.OnDataReceived += OnDataReceived; //Create the Delegate
        UduinoManager.Instance.alwaysRead = true; // This value should be On By Default
    }

    void OnDataReceived(string data, UduinoDevice deviceName)
    {
        if (data == "1")
            PressedDown();
        else if (data == "0")
            PressedUp();
    }
Solution 2 : Using delegates
  void Awake()
    {
        UduinoManager.Instance.OnBoardConnected += OnBoardConnected; //Create the Delegate
    }

    void OnBoardConnected(UduinoDevice connectedDevice)
    {
        connectedDevice.callback = ButtonTriggerEvt;
    }

    void ButtonTriggerEvt(string data)
    {
        if (data == "1")
            PressedDown();
        else if (data == "0")
            PressedUp();
    }
Example: Uduino\Examples\Advanced\ButtonTrigger